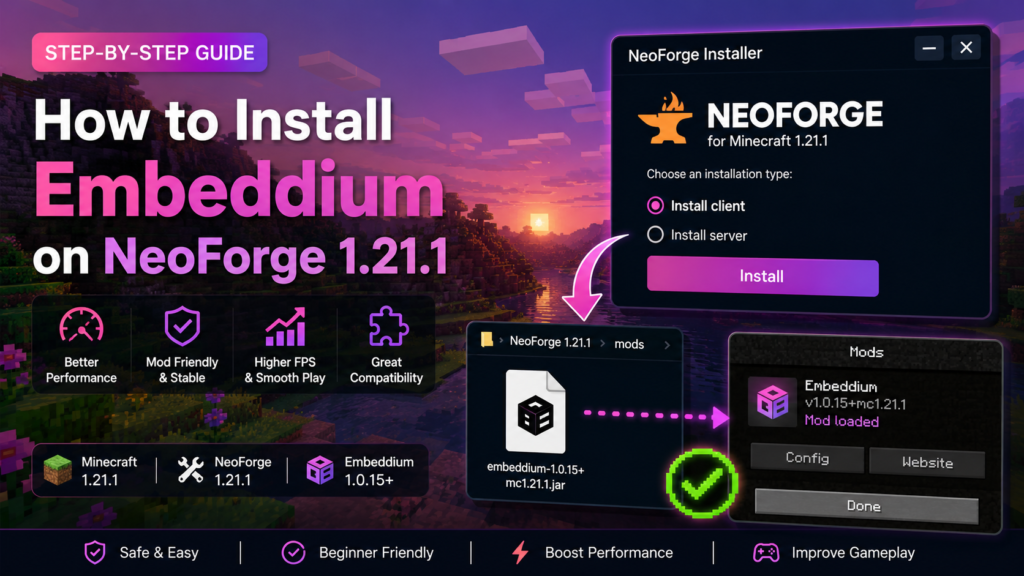
Learning how to install Embeddium on NeoForge 1.21.1 is straightforward when Minecraft, Java, NeoForge, and the Embeddium file all use matching versions. The complete process involves installing Java 21, creating a NeoForge 1.21.1 profile, downloading the compatible Embeddium file, and placing its JAR file inside the correct mods folder.
Embeddium is a free and open-source client performance mod designed to improve Minecraft rendering while prioritizing reliability and compatibility with mods. Its official project information lists NeoForge support for Minecraft 1.21.1 and identifies the mod as client-side.
Quick Installation Summary
To install Embeddium on NeoForge 1.21.1:
- Install 64-bit Java 21.
- Run Minecraft Java Edition 1.21.1 once.
- Download the NeoForge installer for Minecraft 1.21.1.
- Select Install client in the NeoForge installer.
- Launch the new NeoForge profile once.
- Download Embeddium for Minecraft 1.21.1 and NeoForge.
- Place the Embeddium JAR file inside the profile’s
modsfolder. - Launch Minecraft through the NeoForge profile.
- Confirm Embeddium appears in the installed mods list.
Do not extract the Embeddium JAR file or place the NeoForge installer inside the mods folder.
Embeddium 1.21.1 Installation Requirements
Check these requirements before starting:
| Requirement | Required option |
|---|---|
| Minecraft edition | Java Edition |
| Minecraft version | 1.21.1 |
| Mod loader | NeoForge for 1.21.1 |
| Java version | 64-bit Java 21 |
| Embeddium file | 1.0.15+mc1.21.1 or matching official 1.21.1 release |
| Embeddium platform | NeoForge |
| Installation side | Client |
| File format | JAR |
| World backup | Recommended |
NeoForge’s official user guide states that Minecraft 1.20.5 and newer requires Java 21. It also recommends using a 64-bit Java installation because modern Minecraft releases no longer support 32-bit Java.
The official Embeddium listing identifies version 1.0.15+mc1.21.1 as a release for Minecraft 1.21.1, NeoForge, and client-side use. The file was published on January 24, 2025. Check the official version listing before publishing or updating this article in case a newer compatible file becomes available.
Step 1: Back Up Your Minecraft Worlds
Create a backup before installing NeoForge, Embeddium, or any other mod. Installing Embeddium should not normally modify world data, but backups protect your saves if another mod, loader update, or incorrect game version causes a problem.
Open your Minecraft game directory and copy the complete saves folder to another location, such as:
- A separate folder on your computer
- An external drive
- A cloud-storage folder
The official NeoForge guide recommends backing up worlds before updating NeoForge or installed mods.
Step 2: Install and Verify Java 21
Minecraft 1.21.1 with NeoForge requires Java 21. Although the official Minecraft Launcher manages Java for the vanilla game, the separate NeoForge installer may require Java to be installed directly on your computer.
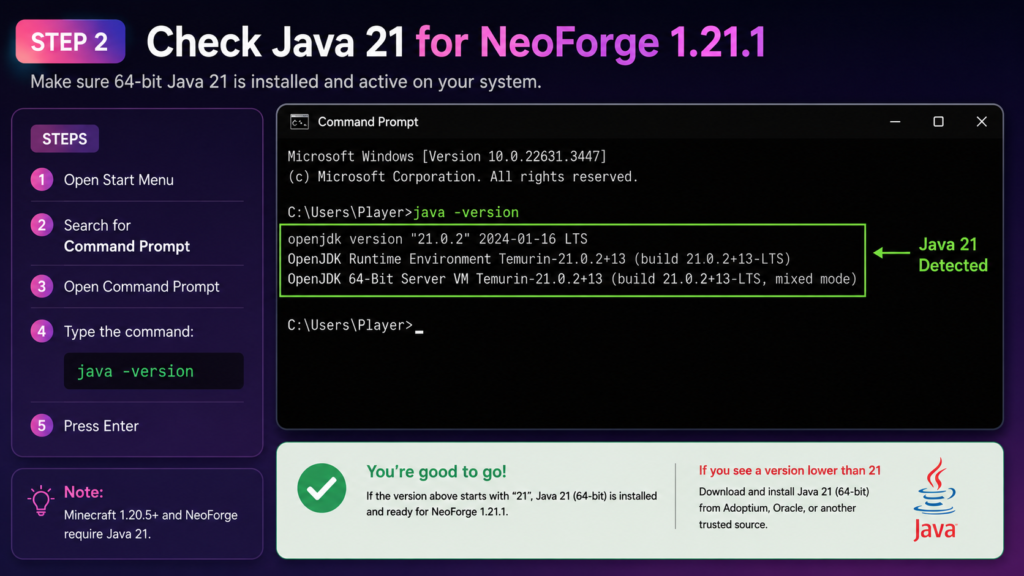
Check your current Java version
On Windows:
- Open the Start menu.
- Search for Command Prompt.
- Open it.
- Enter:
java -versionA correct installation should display a version beginning with 21, such as:
openjdk version "21.0.x"When the command is not recognized or displays an older release, install a 64-bit Java 21 JDK and run the command again. NeoForge’s documentation recommends testing the installed Java version before running its installer.
Step 3: Run Vanilla Minecraft 1.21.1 Once
Open the official Minecraft Launcher and create or select a Minecraft Java Edition 1.21.1 installation.
Launch Minecraft 1.21.1 without mods and wait until the main menu appears. Close the game afterward.
Running the correct vanilla version first helps the launcher download the required game files and confirms that Minecraft 1.21.1 works before NeoForge or Embeddium is added.
Do not continue with another release such as Minecraft 1.21, 1.21.4, or 1.21.5. A mod file built specifically for 1.21.1 may not work with another game version.
Step 4: Download NeoForge for Minecraft 1.21.1
Visit the official NeoForge download page and select:
- Minecraft version: 1.21.1
- NeoForge version: Latest recommended compatible 21.1.x release
- File type: Installer
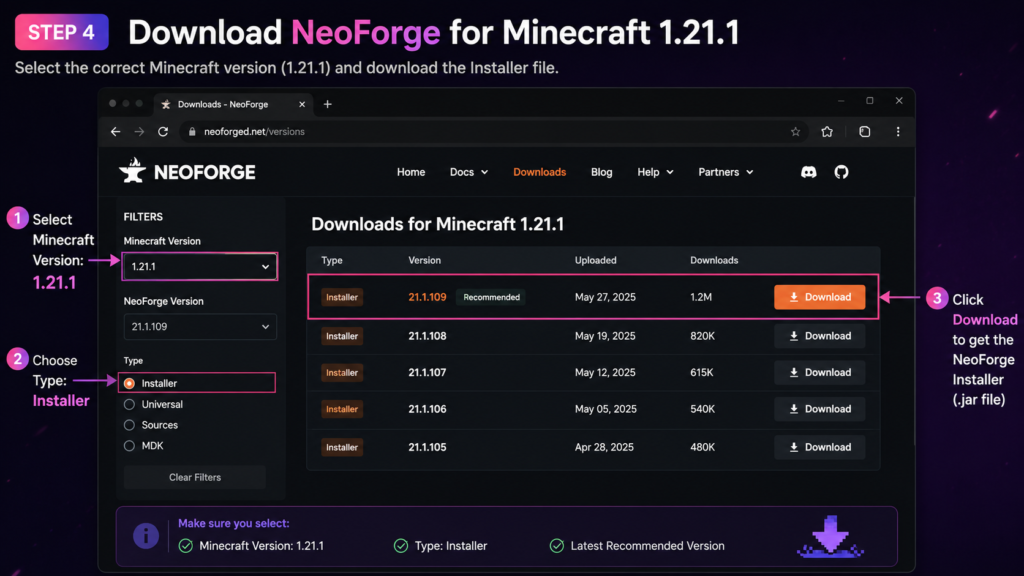
Avoid downloading the MDK, source archive, universal server files, or files made for another Minecraft release.
Save the NeoForge installer JAR somewhere easy to find, such as your Downloads folder.
Step 5: Install the NeoForge Client
Close the Minecraft Launcher completely before running the installer.
Double-click the downloaded NeoForge installer and follow these steps:
- Select Install client.
- Confirm the displayed Minecraft directory.
- Click Proceed.
- Wait for the success message.
- Close the installer.
- Reopen the Minecraft Launcher.
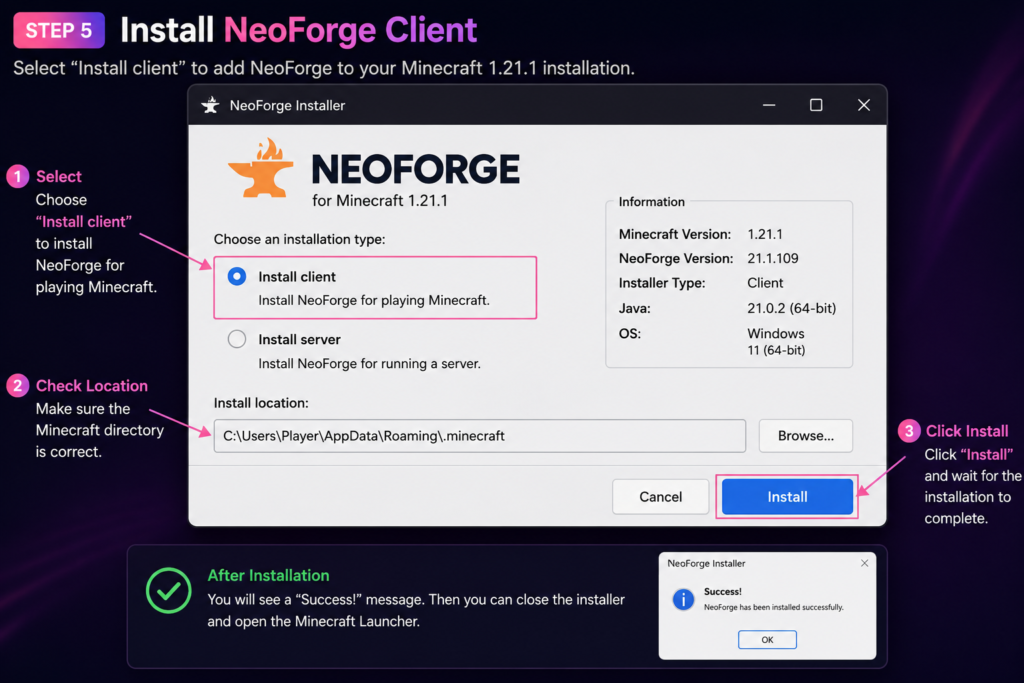
A new NeoForge run option should now appear in the launcher. These steps match NeoForge’s official client installation instructions.
NeoForge installer does not open
When double-clicking the JAR does nothing:
- Confirm that Java 21 is installed.
- Run
java -versionagain. - Restart the computer after installing Java.
- Check whether JAR files are associated with Java.
- Avoid opening the file with WinRAR, 7-Zip, Notepad, or another archive program.
NeoForge’s troubleshooting documentation notes that an incorrect Java installation or file association can prevent the installer from opening.
Step 6: Create a Separate NeoForge Installation
Using a separate game directory keeps the NeoForge 1.21.1 installation isolated from vanilla Minecraft and other modded profiles.
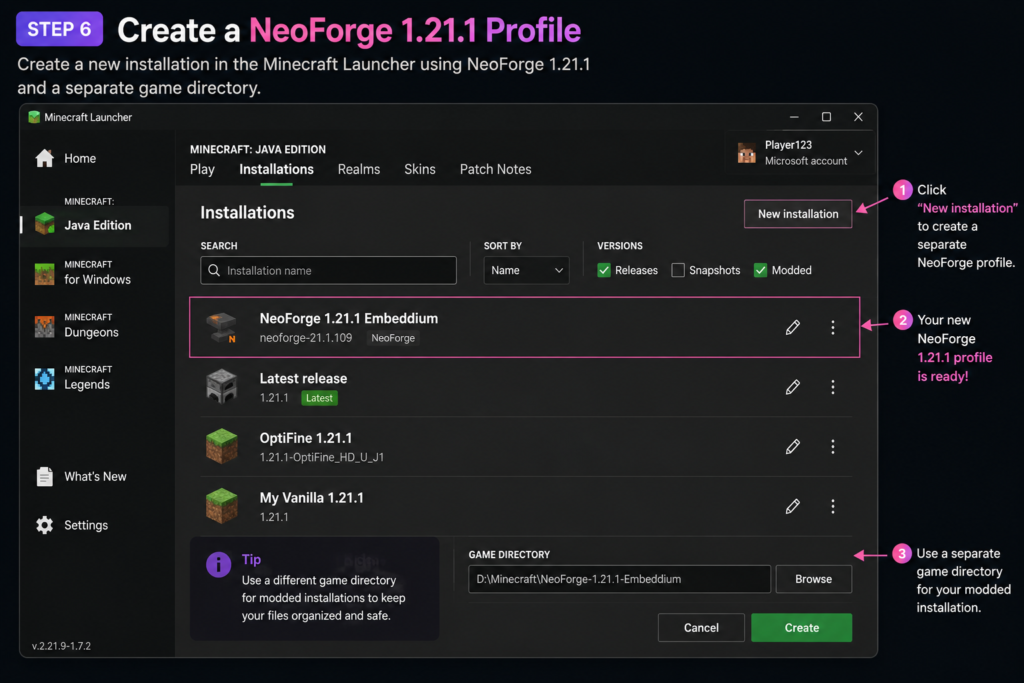
In the Minecraft Launcher:
- Open the Installations tab.
- Select New Installation.
- Enter a name such as:
NeoForge 1.21.1 Embeddium- Select the installed NeoForge 1.21.1 version.
- Choose a separate game directory.
- Save the installation.
- Launch it once.
- Close Minecraft after reaching the main menu.
NeoForge officially recommends custom launch profiles and separate game directories for modded installations. Launching the profile once also creates the required folders, including the mods folder.
Step 7: Download the Correct Embeddium File
Open the official Embeddium project page on Modrinth or CurseForge and filter the files using:
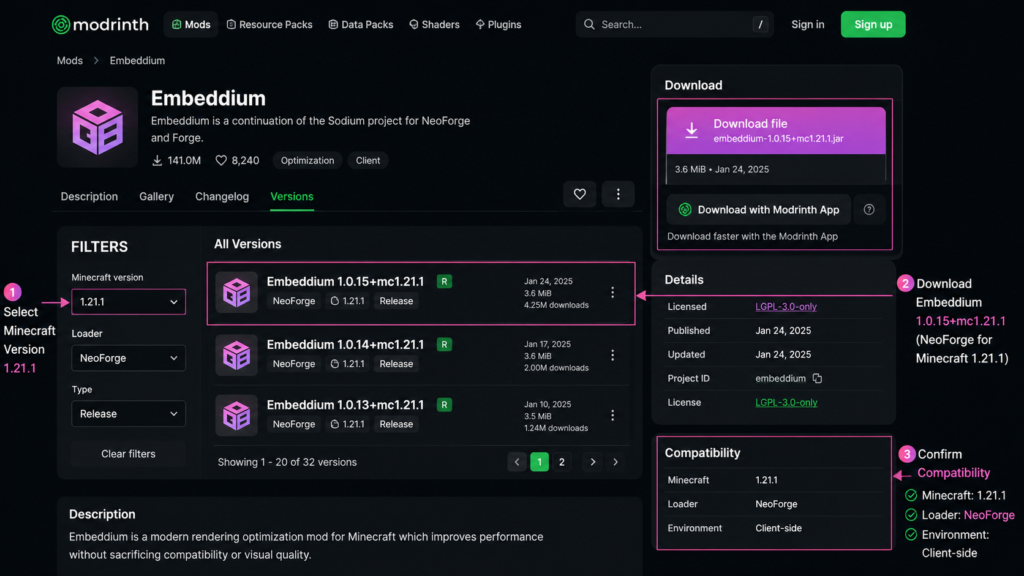
- Minecraft 1.21.1
- NeoForge
- Release files
For this setup, the file should clearly show:
Minecraft: 1.21.1
Platform: NeoForge
Environment: Client-side
The official 1.21.1 release listing currently identifies Embeddium 1.0.15+mc1.21.1 as compatible with NeoForge.
Check the file details rather than selecting a download only because it has the highest version number. A newer file designed for Minecraft 1.21.4 or another loader will not automatically work on 1.21.1.
Avoid incompatible files
Do not install:
- A Fabric-only Embeddium file
- A Forge-only file intended for another Minecraft version
- A 1.20.1 or 1.21.4 file
- Rubidium alongside Embeddium
- Multiple Embeddium versions at the same time
- TexTrue’s Embeddium Options with this release
The official 1.21.1 Embeddium listing identifies Rubidium and TexTrue’s Embeddium Options as known incompatibilities.
Step 8: Place Embeddium in the Mods Folder
Open the game directory selected for your NeoForge 1.21.1 profile.
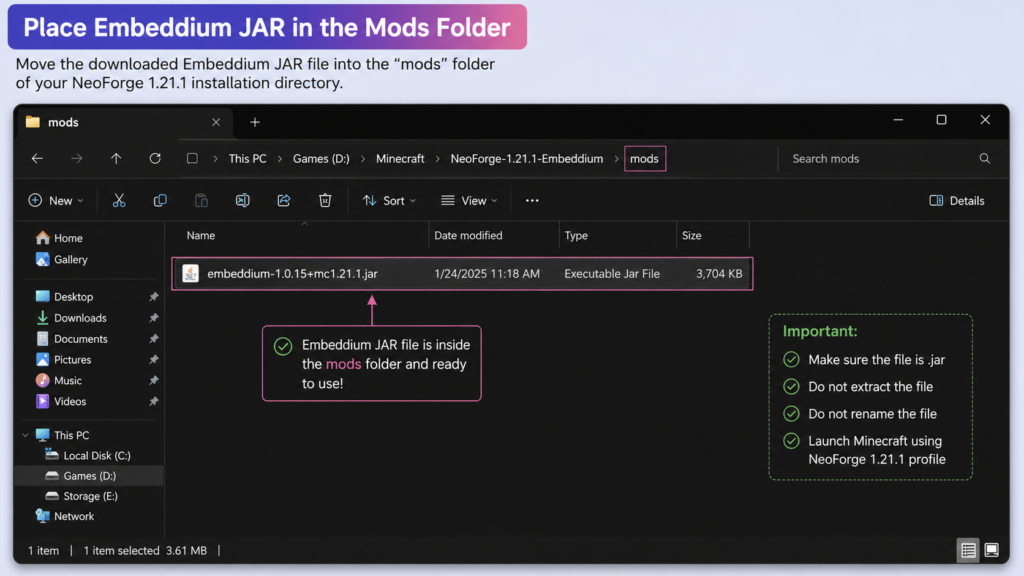
Find the folder named:
modsMove or copy the downloaded Embeddium JAR file into this folder.
The result should look similar to:
NeoForge-1.21.1-Embeddium/
└── mods/
    └── embeddium-1.0.15+mc1.21.1.jar
Keep the file as a .jar. Do not:
- Extract it
- Rename its file extension
- Place it inside the
configfolder - Place it inside another ZIP file
- Put the NeoForge installer in the mods folder
NeoForge’s documentation confirms that mod JAR files should be placed inside the mods folder created in the selected game directory.
Step 9: Launch Minecraft with NeoForge
Return to the Minecraft Launcher and select your dedicated NeoForge 1.21.1 installation.
Click Play and wait for Minecraft to load. The first modded launch can take longer than a normal vanilla launch because NeoForge must prepare configuration files and load installed mods.
Do not close the launcher during the initial loading process unless the game has clearly stopped responding for an extended period.
Step 10: Verify That Embeddium Is Installed
After Minecraft reaches the main menu:
- Open the installed mods list.
- Search for Embeddium.
- Confirm that it is shown as active.
- Open Options.
- Select Video Settings.
- Check that the Embeddium video settings interface is available.
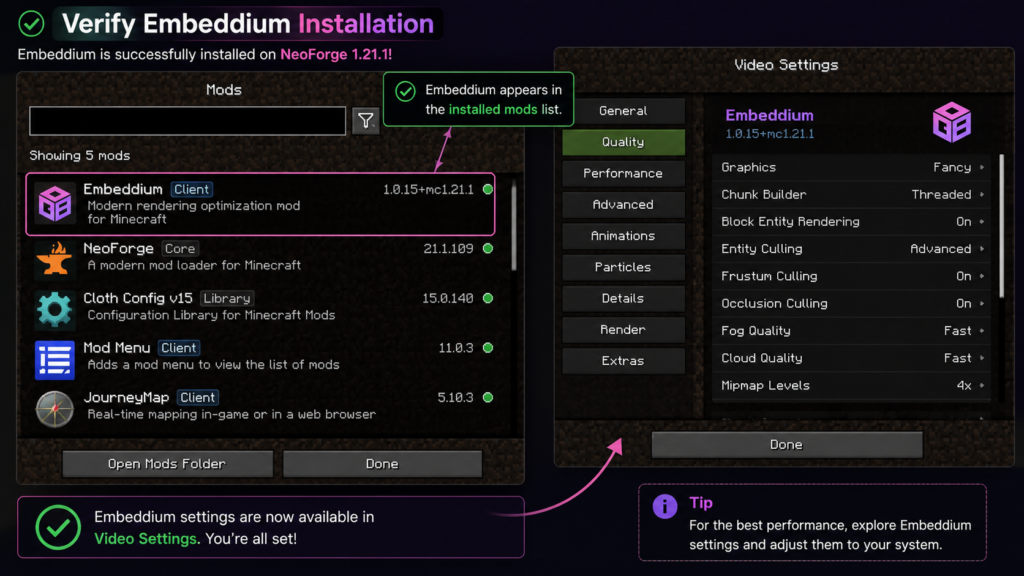
You can also open a world and press F3 to check game information, but the installed mods list and video-settings interface provide clearer verification.
Embeddium is a client-side performance mod, so it is installed in the player’s local Minecraft profile. It is not required on an ordinary server solely for a player to receive its client-rendering improvements.
Recommended First Settings
After installation, start with conservative settings rather than changing every option immediately.
Recommended starting configuration:
| Setting | Starting point |
|---|---|
| Graphics | Fast or Fancy |
| Render distance | 8–12 chunks |
| Simulation distance | 5–8 chunks |
| Clouds | Off or Fast |
| Particles | Decreased |
| Entity distance | 75–100% |
| Biome blend | 2–5 blocks |
| VSync | Test both enabled and disabled |
| Maximum frame rate | Match the monitor or use a stable limit |
Performance results depend on the computer’s processor, graphics hardware, drivers, resource packs, shaders, world complexity, and other installed mods. Do not expect one settings preset to produce identical results on every system.
Common Embeddium Installation Problems
Embeddium does not appear in the mods list
Check that:
- Minecraft is running through the NeoForge profile.
- The selected profile uses Minecraft 1.21.1.
- The file is inside the correct profile’s
modsfolder. - The downloaded file supports NeoForge.
- The file still ends in
.jar. - Embeddium is not stored inside another folder.
A common cause is placing the file inside the default .minecraft/mods folder while the launcher profile uses a separate game directory.
Minecraft crashes during startup
Temporarily remove all mods except Embeddium, then start Minecraft again.
When the game works with only Embeddium installed, add the remaining mods back in small groups until the conflict is identified.
Also remove:
- Rubidium
- Duplicate Embeddium files
- Files built for Minecraft 1.20.1 or 1.21.4
- Fabric or Forge versions placed in a NeoForge profile
- Incompatible video-settings extensions
NeoForge recommends isolating a faulty mod by testing smaller groups when the specific conflict is unknown.
Exit Code 1 appears
Exit Code 1 is a general launcher error rather than one specific Embeddium problem. Common causes include:
- Incorrect Java version
- Wrong mod-loader file
- Mismatched Minecraft version
- Duplicate mods
- Missing dependencies from another installed mod
- Broken configuration files
- Incompatible graphics or rendering mods
Open the profile’s logs folder and inspect latest.log or debug.log for the name of the mod that failed.
The mods folder is missing
Launch the NeoForge profile once and close it after reaching the main menu. The mods folder should then appear in the selected game directory.
You can also create a folder manually and name it exactly:
modsUse lowercase letters and do not add spaces.
Visual glitches appear after installation
First test the game without shaders, resource packs, and other rendering mods. Then update the graphics driver for your AMD, Intel, or NVIDIA hardware.
NeoForge’s troubleshooting guide states that visual issues are often connected to outdated graphics drivers.
How to Update Embeddium on NeoForge 1.21.1
Before updating:
- Back up important worlds.
- Close Minecraft.
- Open the profile’s
modsfolder. - Remove the older Embeddium JAR.
- Download the new file for Minecraft 1.21.1 and NeoForge.
- Add the new JAR to the mods folder.
- Launch Minecraft and verify the mod.
Never leave two Embeddium versions inside the same mods folder.
Do not replace a 1.21.1 file with a release made for a different Minecraft version simply because its Embeddium version number is higher.
How to Uninstall Embeddium
To remove Embeddium:
- Close Minecraft and the launcher.
- Open the NeoForge profile’s game directory.
- Open the
modsfolder. - Delete the Embeddium JAR file.
- Launch the profile again.
Removing Embeddium disables its rendering optimizations and settings interface. It does not normally delete Minecraft worlds, but keeping a backup remains recommended whenever a modded profile is changed.
Frequently Asked Questions
Does Embeddium support NeoForge 1.21.1?
Yes. The official Embeddium project lists Minecraft 1.21.1 and NeoForge as a supported combination. Its official 1.21.1 release is identified as client-side.
Which Java version is required for NeoForge 1.21.1?
NeoForge requires 64-bit Java 21 for Minecraft 1.21.1. The official documentation lists Java 21 for Minecraft 1.20.5 and newer.
Do I need to extract the Embeddium JAR file?
No. Place the original JAR file directly inside the NeoForge profile’s mods folder. Extracting it will prevent NeoForge from loading it as a normal mod.
Does Embeddium need to be installed on a server?
Embeddium is identified as a client-side mod. Players install it locally for client-rendering and performance improvements.
Can I install Rubidium with Embeddium?
No. Rubidium is listed as a known incompatibility for the Embeddium 1.21.1 release. Remove Rubidium before launching the game with Embeddium.
Why is Embeddium not showing in Minecraft?
The most common causes are using the wrong launcher profile, placing the file in the wrong mods folder, downloading a file for another Minecraft version, or selecting a Fabric or Forge file instead of NeoForge.
Can I use multiple Embeddium versions together?
No. Keep only one compatible Embeddium JAR inside the mods folder. Multiple versions may cause duplicate-mod errors or prevent Minecraft from launching.
Will Embeddium guarantee higher FPS?
No specific frame-rate increase is guaranteed. Results depend on hardware, drivers, Minecraft settings, installed mods, shaders, resource packs, and the complexity of the loaded world.
Conclusion
Embeddium can be installed on NeoForge 1.21.1 by using Java 21, installing a matching NeoForge client profile, downloading the correct 1.21.1 NeoForge release, and placing its JAR file inside the profile’s mods folder.
The most important part of the installation is version matching. Minecraft, NeoForge, and Embeddium must all support 1.21.1. Keep only one Embeddium file installed, remove incompatible rendering mods, back up important worlds, and verify the installation through the Minecraft mod list and video settings.