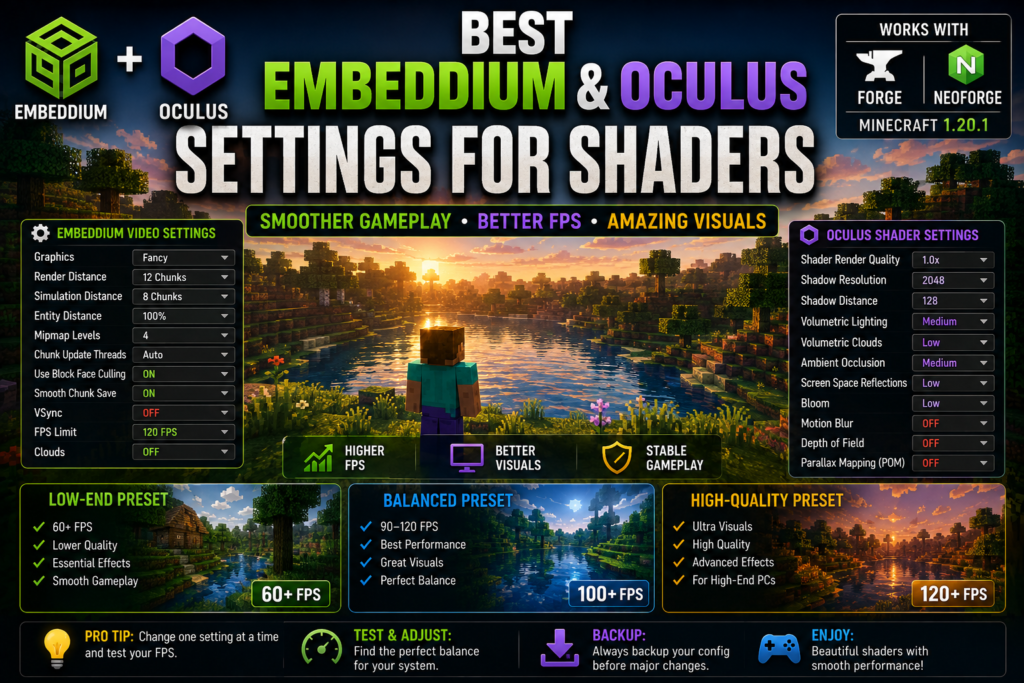
Embeddium and Oculus are a popular combination for running shaders on Minecraft 1.20.1 Forge or NeoForge. Embeddium optimizes the game’s rendering pipeline, while Oculus provides shader-pack support through a Forge-compatible fork of Iris. The combination can produce much better visuals without giving up all the performance benefits of a modern rendering mod.
Good shader performance still depends on the correct versions, graphics hardware, shader pack, render distance, and individual shader options. Copying a high-end preset onto an integrated GPU can cause severe stuttering, while using extremely low settings on a capable GPU can make the game look unnecessarily flat.
This guide provides three practical presets—Low-End, Balanced, and High Quality—along with an installation check, recommended Embeddium options, shader settings, testing order, and fixes for common FPS, crash, shadow, water, and transparent-block problems.
Quick Recommended Settings
For most mid-range systems, begin with:
| Setting | Balanced Starting Value |
|---|---|
| Graphics | Fancy |
| Render Distance | 10–12 chunks |
| Simulation Distance | 6–8 chunks |
| Entity Distance | 75–100% |
| Particles | Decreased |
| Clouds | Off |
| VSync | Off while testing |
| FPS Limit | 60, 90, 120, or monitor refresh rate |
| Shader Render Quality | 1.0x |
| Shadow Resolution | 2048 |
| Shadow Distance | 80–128 blocks |
| Volumetric Lighting | Low or Medium |
| Volumetric Clouds | Off or Low |
| Screen-Space Reflections | Off or Low |
| Parallax/POM | Off |
| Motion Blur | Off |
| Depth of Field | Off during gameplay |
These values are starting points rather than universal requirements. Shader-pack menus use different names, and some packs combine several effects under one quality preset.
Use the Correct Embeddium and Oculus Versions
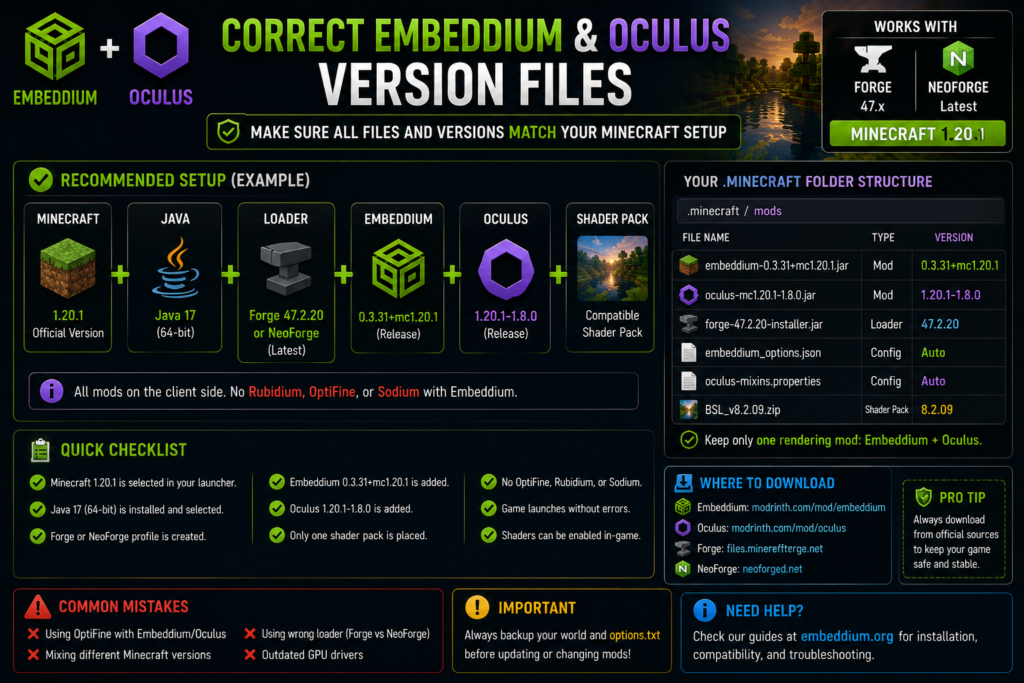
Settings cannot fix an incompatible installation. As of August 2, 2026, Embeddium 0.3.31+mc1.20.1 is an official release for Minecraft 1.20.1 on Forge and NeoForge. Its release page lists Rubidium and TexTrue’s Embeddium Options as known incompatibilities.
Oculus 1.20.1-1.8.0 is an official client-side release for Forge and NeoForge, requires a compatible Embeddium version, and includes a Distant Horizons 2.2+ compatibility fix.
A clean Minecraft 1.20.1 shader profile should normally contain:
- Minecraft 1.20.1
- Java 17
- A compatible Forge 47.x or NeoForge build
- Embeddium 0.3.31
- Oculus 1.8.0
- One compatible shader pack
Do not install Rubidium, OptiFine, Sodium, and Embeddium together. Keep one main rendering mod.
For a new profile, follow the Embeddium Forge 1.20.1 installation guide. Check Embeddium Compatible Minecraft Versions before using another Minecraft or loader version.
Best Embeddium Video Settings for Shaders
Graphics Quality
Use Fancy for a balanced visual result. Switch to Fast on weak integrated graphics or when a shader already replaces most lighting, leaves, clouds, and water effects.
Fancy graphics can improve transparent leaves and other details, but the shader pack often has a greater performance impact than this setting.
Render Distance
Use:
- 6–8 chunks: low-end laptop or integrated GPU
- 10–12 chunks: balanced preset
- 12–16 chunks: strong gaming GPU
- Above 16 chunks: only after monitoring frame times
Shaders process lighting, shadows, fog, and reflections across visible terrain. Increasing render distance therefore affects more than ordinary chunk rendering. A stable 10–12 chunks usually feels better than an unstable 20–24 chunks.
Simulation Distance
Use 5–6 chunks on low-end systems and 6–8 chunks for most shader setups.
Simulation distance controls activities such as mob behavior, crop growth, redstone, and other world calculations. Reducing it can help CPU-limited systems even when GPU usage remains high.
Frame-Rate Limit
Do not automatically use Unlimited.
Choose a cap your computer can hold consistently:
- 30 or 45 FPS for very weak systems
- 60 FPS for stable general gameplay
- 90 or 120 FPS for high-refresh displays
- Monitor refresh rate for stronger systems
A stable cap reduces GPU heat, fan noise, power consumption, and large frame-time swings. Use Unlimited only when benchmarking.
VSync
Turn VSync off during performance testing so you can see the real frame rate. Enable it later if screen tearing is distracting.
VSync can make a game appear locked to 30 or 60 FPS when performance drops below a synchronization threshold, so test both states before deciding.
Entity Distance
Use 75% for low-end systems and 100% for balanced or high-end setups.
Reducing entity distance can help in villages, farms, modded bases, and other locations containing many mobs, item frames, chests, machines, or block entities.
Particles
Use Decreased for a balanced preset. Use Minimal for weak hardware or combat-heavy modpacks.
Shaders can make smoke, weather, explosions, spell effects, and other particles more expensive to display.
Clouds
Disable Minecraft clouds when the shader pack provides its own volumetric or stylized clouds. Running both can create duplicated cloud layers, visual clipping, or unnecessary GPU load.
Mipmap and Biome Blend
Use mipmap levels 2–4.
Reduce biome blend to 2–3 blocks on weaker systems. Use 5 blocks when smoother transitions between grass and foliage colors matter more than a small performance improvement.
Chunk Update Threads
Leave chunk-update threading on Default or Auto first.
Manually forcing high thread values can increase stuttering or make Minecraft less responsive on processors with fewer cores. Adjust this setting only after testing the default behavior.
Best Oculus and Shader-Pack Settings
Oculus loads the selected shader pack, but most demanding graphics options are controlled inside that shader pack. Exact names vary, so use the closest equivalent available.
Shader Render Quality
Use:
- 0.70x–0.80x: low-end preset
- 1.00x: balanced preset
- 1.00x–1.25x: high-quality preset
Lower internal render quality can provide a major FPS improvement, but text, foliage, and distant edges may look softer. Increase it only when the GPU has enough performance headroom.
Shadow Resolution
Recommended values:
- 1024: low-end
- 2048: balanced
- 4096: high quality
Higher shadow resolution produces sharper shadow edges but consumes more GPU resources and video memory. Shadow distance often has a larger performance impact than shadow resolution.
Shadow Distance
Use:
- 48–64 blocks: low-end
- 80–128 blocks: balanced
- 128–192 blocks: high quality
Avoid moving this slider directly to its maximum. Distant shadows can be expensive while being difficult to notice during normal gameplay.
Volumetric Lighting and Clouds
Volumetric effects create visible light rays, atmospheric fog, and realistic clouds. They are also among the heaviest shader features.
For balanced gameplay, use Low or Medium volumetric lighting and keep volumetric clouds Off or Low.
High-end GPUs can use Medium or High after confirming stable frame times in forests, mountains, rain, and sunrise or sunset scenes.
Reflections
Keep screen-space reflections Off or Low for balanced settings.
Reflections can affect water, wet blocks, metals, and modded materials, but they may create visual noise or disappear near the edge of the screen.
Ambient Occlusion
Use Low or Medium ambient occlusion.
It adds depth around block edges, corners, and contact areas at a smaller cost than many advanced shader effects. Disable it only when the shader appears too dark, or the GPU is heavily limited.
Parallax Occlusion Mapping
Keep POM or parallax effects off unless you use a compatible resource pack and have a strong GPU.
The feature can make flat block textures appear three-dimensional, but it can significantly reduce FPS and may produce incorrect surfaces with unsupported resource packs.
Anti-Aliasing and Temporal Filtering
Enable TAA or the shader’s temporal anti-aliasing when available. It reduces shimmering on leaves, fences, grass, and distant terrain.
If the image becomes blurry or leaves trails behind moving objects, lower temporal strength or enable the shader pack’s sharpening option.
Bloom, Motion Blur, and Depth of Field
Use Low bloom for subtle light highlights.
Disable motion blur for clearer movement and better responsiveness. Disable depth of field during normal gameplay; it is usually more useful for screenshots and cinematic recordings.
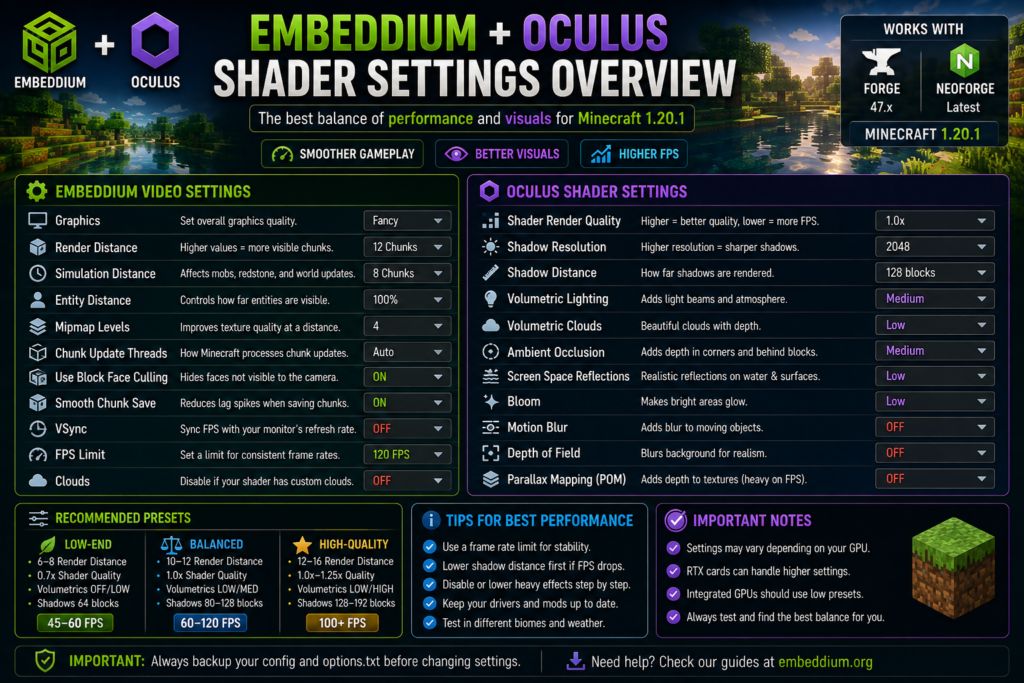
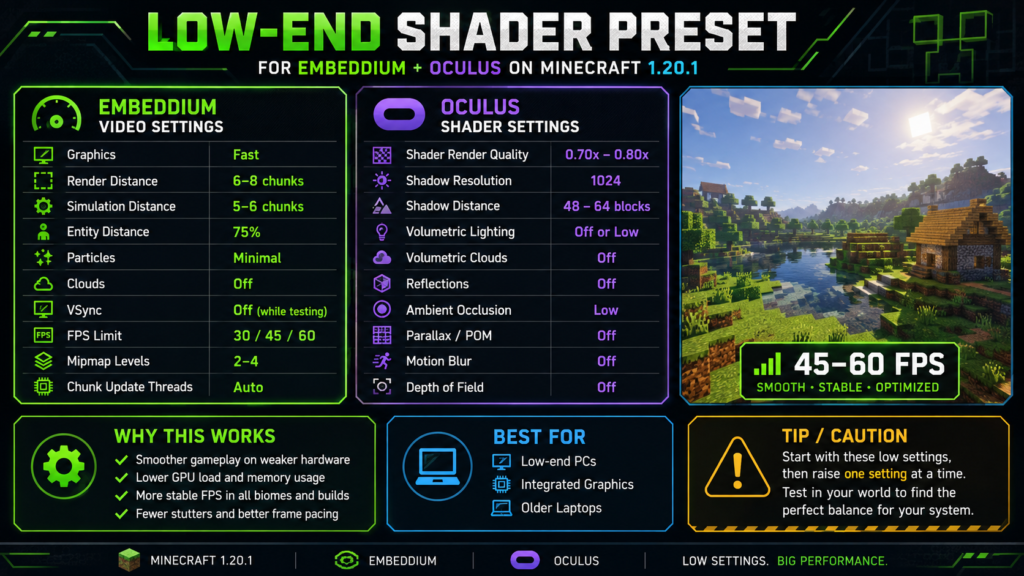
Low-End Shader Preset
Use this preset for integrated graphics, older laptops, or systems struggling to maintain smooth gameplay:
| Setting | Low-End Value |
| Graphics | Fast |
| Render Distance | 6–8 chunks |
| Simulation Distance | 5–6 chunks |
| FPS Cap | 30, 45, or 60 |
| Entity Distance | 75% |
| Particles | Minimal |
| Clouds | Off |
| Shader Quality | 0.70x–0.80x |
| Shadow Resolution | 1024 |
| Shadow Distance | 48–64 |
| Volumetric Effects | Off |
| Reflections | Off |
| Ambient Occlusion | Low |
| POM | Off |
| Motion Blur and DOF | Off |
Select the shader pack’s Low, Potato, or Performance preset where available. Avoid combining shaders with high-resolution resource packs on weak hardware.
For a complete non-shader performance baseline, use the Best Embeddium Settings for Low-End PCs guide.
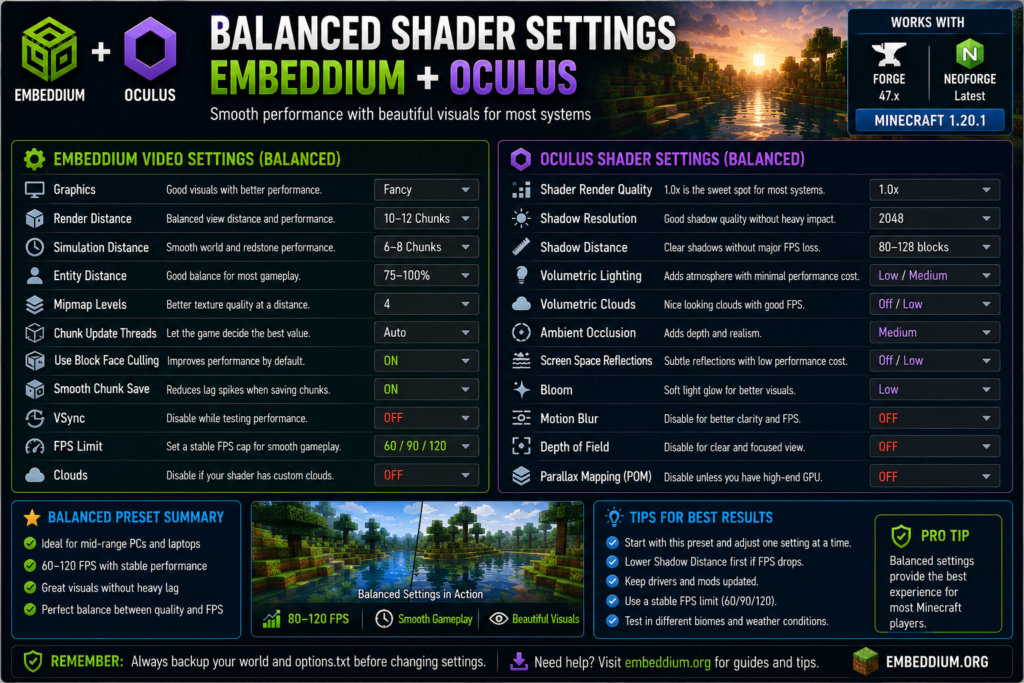
Balanced Shader Preset
This is the best starting point for most gaming systems:
| Setting | Balanced Value |
| Graphics | Fancy |
| Render Distance | 10–12 chunks |
| Simulation Distance | 6–8 chunks |
| FPS Cap | 60, 90, or 120 |
| Entity Distance | 75–100% |
| Particles | Decreased |
| Clouds | Off |
| Shader Quality | 1.00x |
| Shadow Resolution | 2048 |
| Shadow Distance | 80–128 |
| Volumetric Lighting | Low or Medium |
| Volumetric Clouds | Off or Low |
| Reflections | Off or Low |
| Ambient Occlusion | Medium |
| POM | Off |
| Bloom | Low |
| Motion Blur and DOF | Off |
Play for at least ten minutes in forests, villages, caves, rain, and water-heavy areas before raising quality.
Average FPS alone is not enough. Watch for repeated stutters, delayed chunk rendering, sudden frame-time spikes, and excessive GPU temperatures.
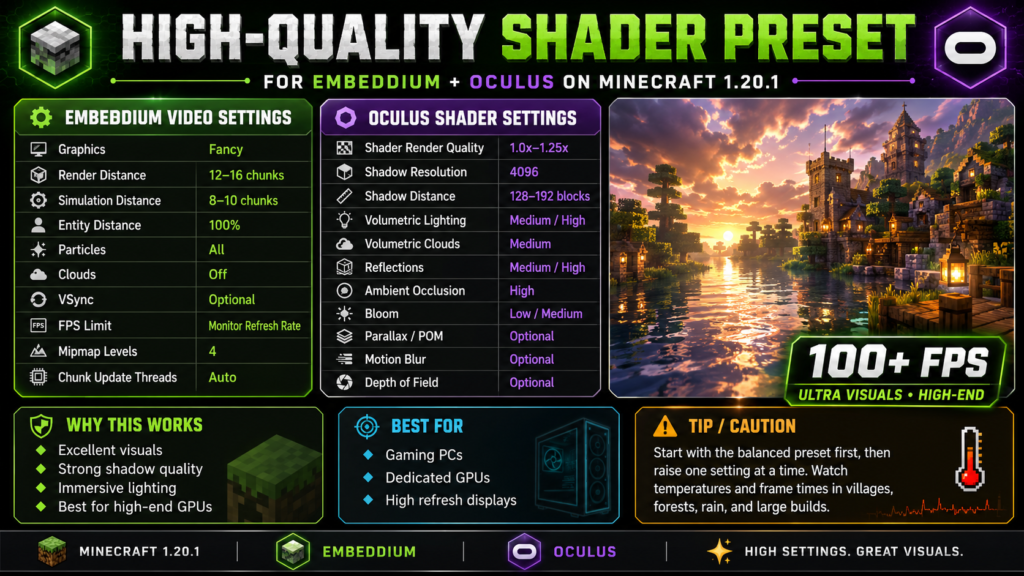
High-Quality Shader Preset
Use this preset only after the balanced configuration is stable:
| Setting | High-Quality Value |
| Graphics | Fancy |
| Render Distance | 12–16 chunks |
| Simulation Distance | 8–10 chunks |
| FPS Cap | Monitor refresh rate |
| Entity Distance | 100% |
| Particles | All |
| Shader Quality | 1.00x–1.25x |
| Shadow Resolution | 4096 |
| Shadow Distance | 128–192 |
| Volumetric Lighting | Medium or High |
| Volumetric Clouds | Medium |
| Reflections | Medium or High |
| Ambient Occlusion | High |
| POM | Optional |
| Bloom | Low or Medium |
| Motion Blur and DOF | Personal preference |
Do not assume a high-end GPU removes every bottleneck. Large modpacks, world-generation mods, high simulation distance, and busy bases can remain limited by the CPU.
Safe Testing Order
Use this testing order to avoid confusing a shader problem with an installation or mod-conflict problem:
- Launch Minecraft with Embeddium only.
- Confirm that chunks, blocks, water, and menus render correctly.
- Add Oculus but leave shaders disabled.
- Launch again and check the Mods screen.
- Add one shader pack.
- Start with its Low or Medium preset.
- Test a new world.
- Change one setting at a time.
- Add other rendering mods only after the base setup is stable.
Oculus is an unofficial Iris fork created to provide shader support through Forge Mod Loader. Its official project listing identifies it as a client-side shader mod for Forge and NeoForge.
Fix Low FPS and Stuttering
First identify whether the GPU or CPU is overloaded.
For GPU-Limited Performance
- Lower shader render quality
- Reduce shadow distance
- Disable volumetric clouds
- Disable reflections
- Lower shadow resolution
- Disable POM
- Reduce render distance
For CPU-Limited Performance
- Lower simulation distance
- Reduce entity distance
- Reduce normal render distance
- Leave generation threads on Auto
- Close background applications
- Test without heavy world-generation mods
Do not allocate excessive RAM. Too little memory can cause pauses, but an unnecessarily large allocation can also contribute to longer garbage-collection pauses.
For maximum performance without shaders, compare the results with the Best Embeddium Settings for Maximum FPS guide.
Fix Crashes or Visual Problems
If Minecraft crashes after enabling shaders:
- Disable the shader pack.
- Confirm Oculus and Embeddium versions.
- Remove duplicate renderers.
- Test without resource packs.
- Update GPU drivers.
- Try another shader pack.
- Check
latest.logand the crash report.
Use the dedicated Embeddium and Oculus Crash on Minecraft 1.20.1 guide for startup and shader-compilation errors.
If blocks, water, or chunks become transparent, disable shaders first and follow the Embeddium Invisible Blocks and Transparent Chunks Fix.
Official Oculus issue reports document crashes in some specific shader, addon, memory, and Embeddium combinations. These reports do not establish a universal incompatibility, but they support testing a clean profile before blaming one mod.
Frequently Asked Questions
Does Embeddium support shaders by itself?
No. Embeddium improves Minecraft rendering performance, but Oculus provides shader-pack support on compatible Forge and NeoForge installations.
What is the best render distance for shaders?
Use 6–8 chunks on weak hardware, 10–12 chunks for balanced gameplay, and 12–16 chunks for stronger systems. Higher values should only be used after checking frame-time stability.
Should VSync be enabled?
Disable it while measuring performance. Enable it afterward if screen tearing is noticeable and the additional input latency does not bother you.
Why do shaders reduce FPS so much?
Shaders add dynamic shadows, advanced lighting, reflections, fog, clouds, ambient effects, and post-processing. These features increase the GPU workload for every rendered frame.
Is Oculus 1.8.0 compatible with Embeddium?
The official Oculus 1.20.1-1.8.0 release requires a compatible Embeddium version and supports Forge and NeoForge.
Can I use OptiFine with Embeddium and Oculus?
It is not recommended. OptiFine overlaps with their rendering and shader functions and can cause conflicts, startup problems, or incorrect visuals.
Which setting should I disable first for more FPS?
Lower shader render quality and shadow distance first. Then disable volumetric clouds, reflections, parallax mapping, and high shadow resolution.
Why do distant shadows disappear?
The shader pack’s shadow distance is separate from Minecraft render distance. Increase shadow distance carefully because it can have a major effect on performance.
Can I use Distant Horizons with this setup?
Oculus 1.8.0 includes a compatibility fix for Distant Horizons 2.2 and newer. Use matching versions and follow the Embeddium and Distant Horizons Compatibility Guide.
Should I use Unlimited FPS?
Use Unlimited only for benchmarking. A stable frame-rate cap usually provides smoother frame times, lower temperatures, and less fan noise.
Conclusion
For most players, the best Embeddium and Oculus settings for shaders are:
- 10–12 chunks of render distance
- 6–8 chunks of simulation distance
- 1.0x shader render quality
- 2048 shadow resolution
- 80–128 blocks of shadow distance
- Decreased particles
- Low or Medium volumetric lighting
- Volumetric clouds Off or Low
- Reflections Off or Low
- Motion blur and depth of field Off
Begin with the Balanced preset. Test the game in several demanding environments, then increase one option at a time.
When performance is poor, reduce shader render quality and shadow distance before lowering every Minecraft setting. These two options often provide the most noticeable improvement without completely removing the visual benefits of shaders.
A correct version combination and disciplined testing order matter as much as the visual preset. Keep one main renderer, one Oculus file, and one shader pack during troubleshooting, then add optional mods gradually.